Integrating with ActiveCampaign
Getting Started
This document will help you easily integrate ActiveCampaign with QuickEmailVerification.
QuickEmailVerification app will help you easily separate unreachable, risky or incorrect email addresses from your ActiveCampaign account. As a result, your email campaign will have practically zero bounces. The email validation and verification that QuickEmailVerification carries out is swift and secure. In fact, it is the most dependable way to stop fake and invalid email from entering your mailing list.
Get a QuickEmailVerification API key
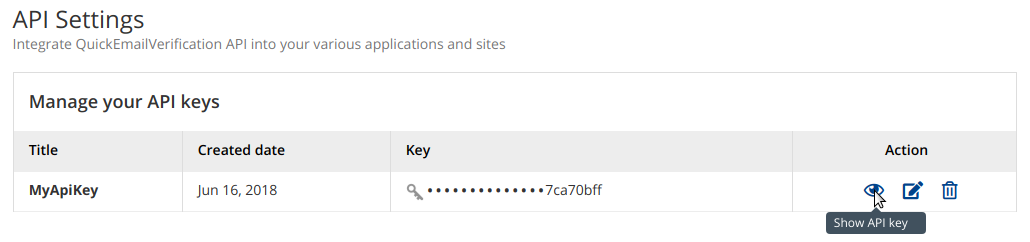
To use the QuickEmailVerification app in your ActiveCampaign account, you will need to get a QuickEmailVerification API Key. Log in to your QuickEmailVerification account to get the key. Sign up on QuickEmailVerification if you don't have an account - won't take a minute. Go to the API Settings page. Click on Add API key button to create a new API key. Once you create an API, you will see your API credentials on the screen.

If you already have an API created in your QuickEmailVerification account, you may click on the Eye icon to see the API key again on the screen.
How to integrate QuickEmailVerification app in ActiveCampaign
The main goal of QuickEmailVerification is to verify email addresses and help you get increased deliverability of your emails. That will give a better ROI for your campaign. Here the QuickEmailVerification app will be useful in order to achieve your goals.
Creating custom fields
To make QuickEmailVerification and ActiveCampaign integration work, you need to create custom fields in ActiveCampaign.
To create custom fields in ActiveCampaign,
- Log in to your ActiveCampaign account and navigate to the "Lists" option.
- From "Lists" option, click on "Manage Fields" option.
- From the "Manage Fields" page, click on the "Add Field" button to create custom fields to store QuickEmailVerification email verification results. Follow the same process to add all QuickEmailVerification fields. Here is a document explaining the meaning of each result field that you need to create for updating verification results.
| Field Name | Field Type |
| QuickEmailVerification Result | Text Input |
| QuickEmailVerification Reason | Text Input |
| QuickEmailVerification Disposable | Text Input |
| QuickEmailVerification Accept All | Text Input |
| QuickEmailVerification Role | Text Input |
| QuickEmailVerification Free | Text Input |
| QuickEmailVerification User | Text Input |
| QuickEmailVerification Domain | Text Input |
| QuickEmailVerification MX Record | Text Input |
| QuickEmailVerification MX Domain | Text Input |
| QuickEmailVerification Safe To Send | Text Input |
| QuickEmailVerification Did You Mean | Text Input |
After you create fields as required, you can find all of them in the contact details page of ActiveCampaign.
QuickEmailVerification app
To connect the QuickEmailVerification app in ActiveCampaign, follow the steps below:
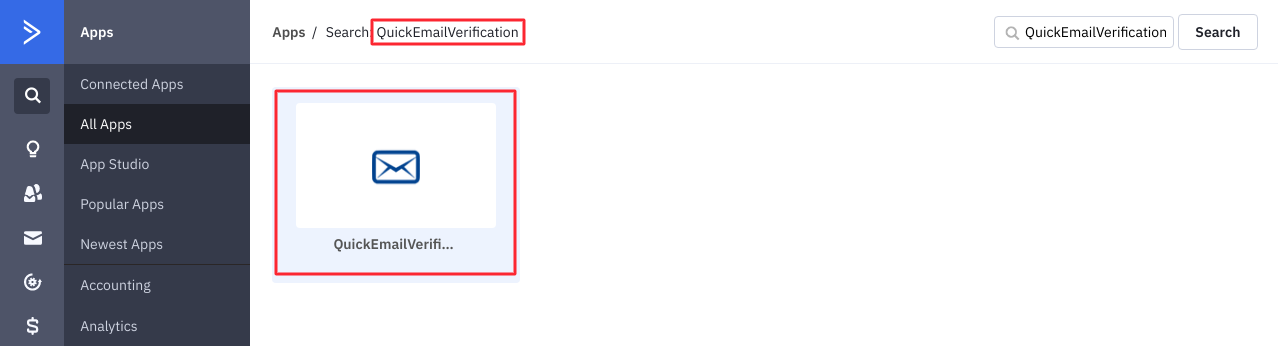
- Log in to your ActiveCampaign account and navigate to the Apps section.
- Use the search field on the top right of the “All Apps” page and search for QuickEmailVerification. Click the QuickEmailVerification option to open it.
-
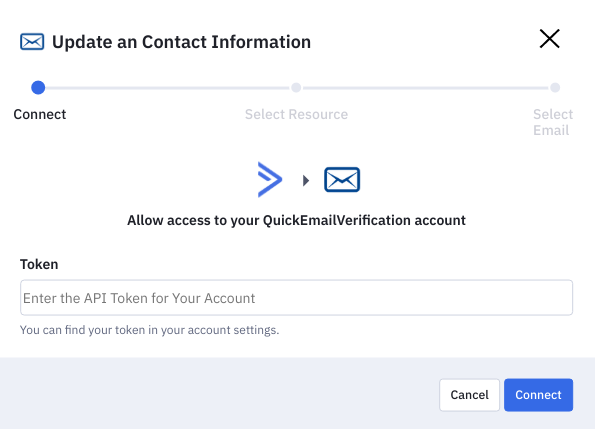
When the QuickEmailVerification app page loads, click the "Add an account" button.
-
When prompted, enter the QuickEmailVerification API key to proceed.
If you have multiple ActiveCampaign accounts, please use a separate QuickEmailVerification API key for each ActiveCampaign account. Using the same API key in more than one ActiveCampaign accounts can cause the connection to reset.
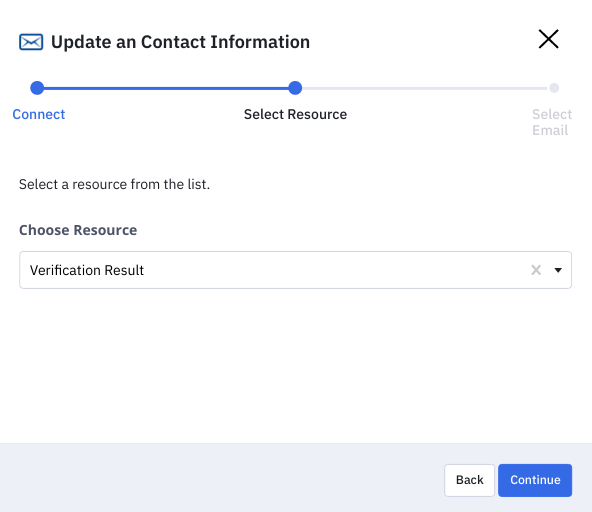
- You will now see an option to choose a resource. Select "Verification Result" from there and then click on the "Continue" button.
- In the next step, you will need to map the email address you have verified in QuickEmailVerification to the email address field in ActiveCampaign. Along with the email address you will be required to map all the QuickEmailVerification result fields with ActiveCampaign custom fields. Follow simple steps to Create custom fields in ActiveCampaign if you have not created already.
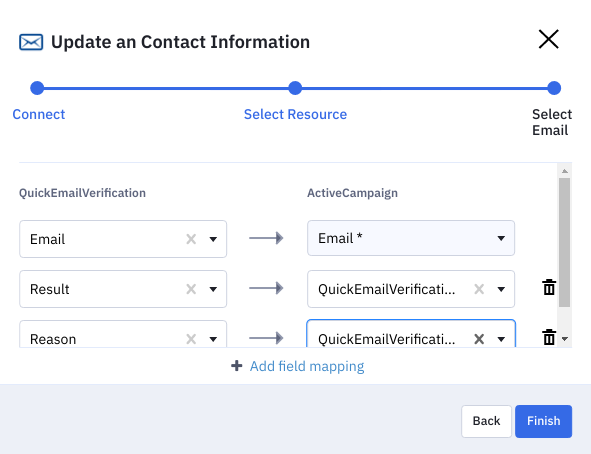
- Click on the "Finish" button and you are good to go! You can see that the ActiveCampaign connection has been setup for your QuickEmailVerification API key. That means the QuickEmailVerification app is now ready for you to use.
Please note that only one connection is required per account. A single connection can work with multiple automations seamlessly.
Creating Automation
To use the QuickEmailVerification app, you will need to create automation once. That way, every time this automation is executed, email verification will be done automatically.
Here, we are creating sample automation.
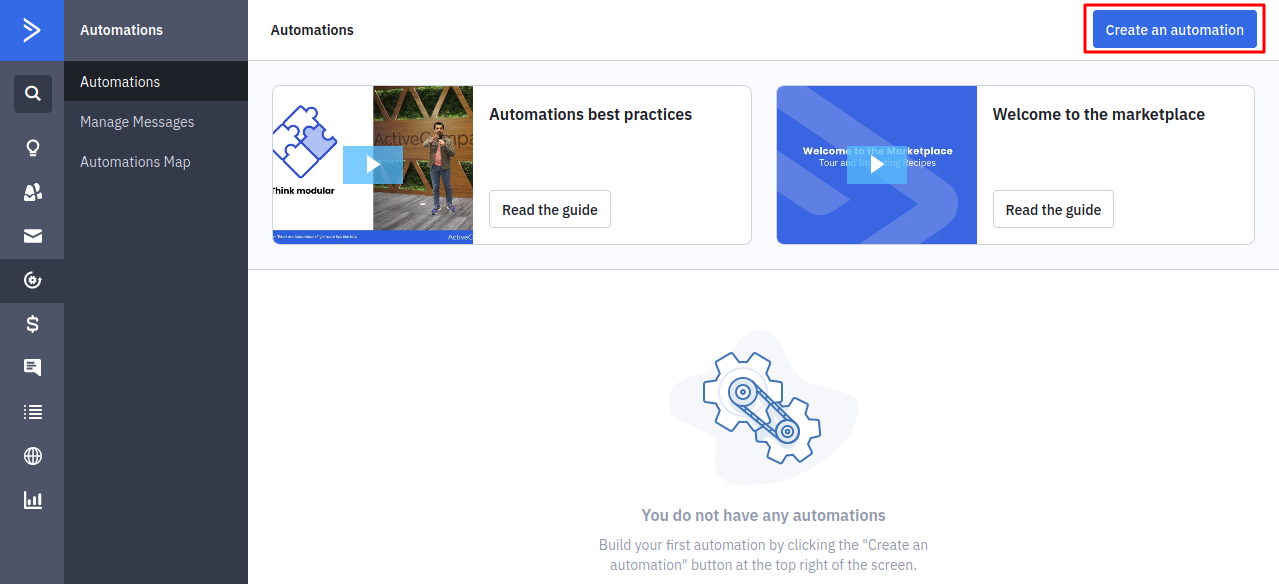
- Log in to your ActiveCampaign account and navigate to the "Automations" option.
- From "Automations" option, click on the "Create an automation" button.
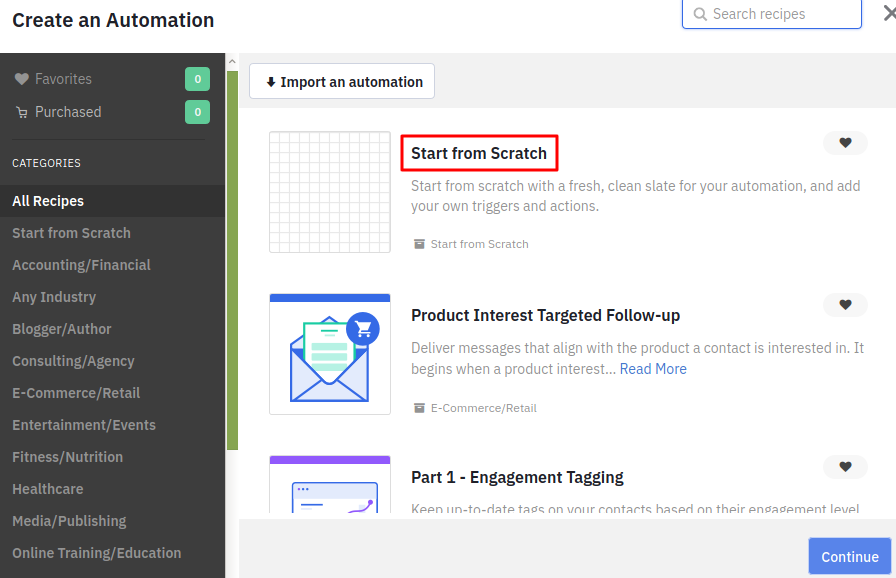
- Now click on "Start from Scratch" option and then click on the "Continue" button.
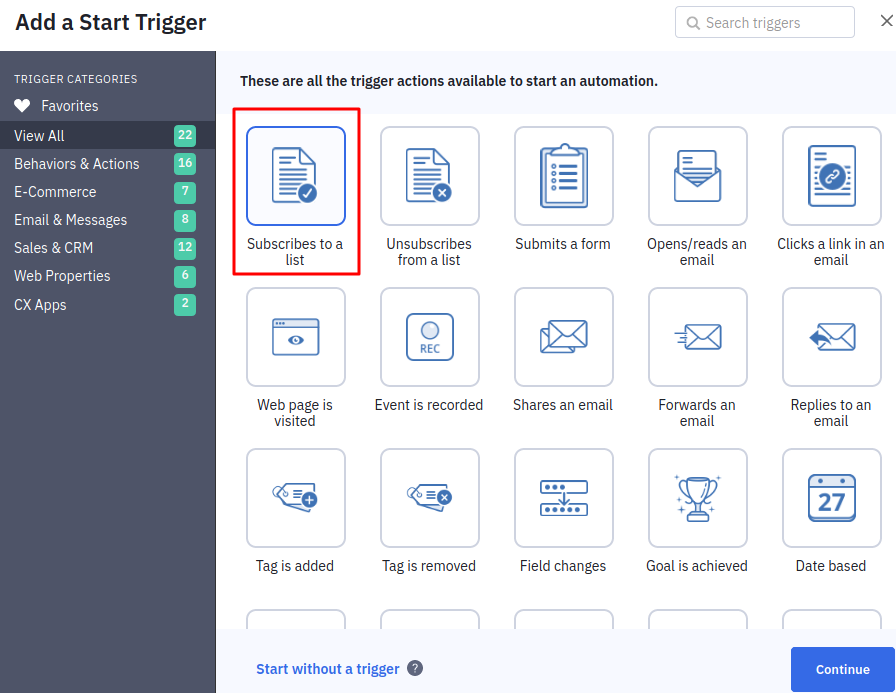
- Once you click the Continue button, ActiveCampaign will prompt you to choose a start trigger. For example you can select "Subscribes to a list" or "Typeform form received" or any trigger from the available list. Then click on the "Continue" button.
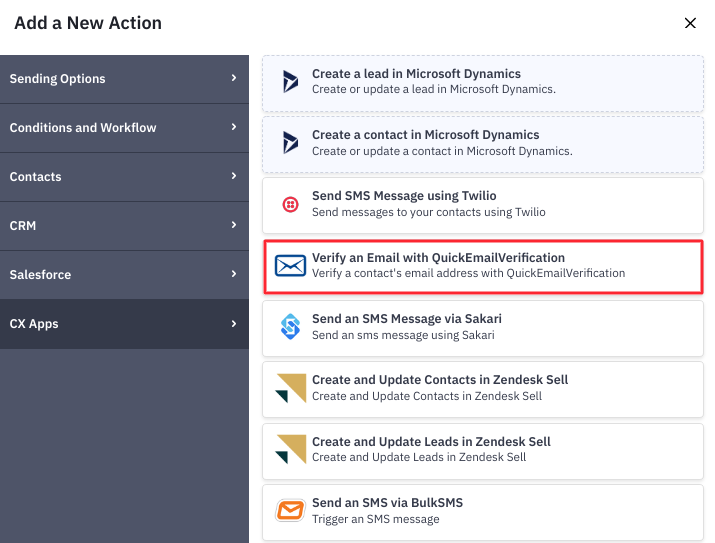
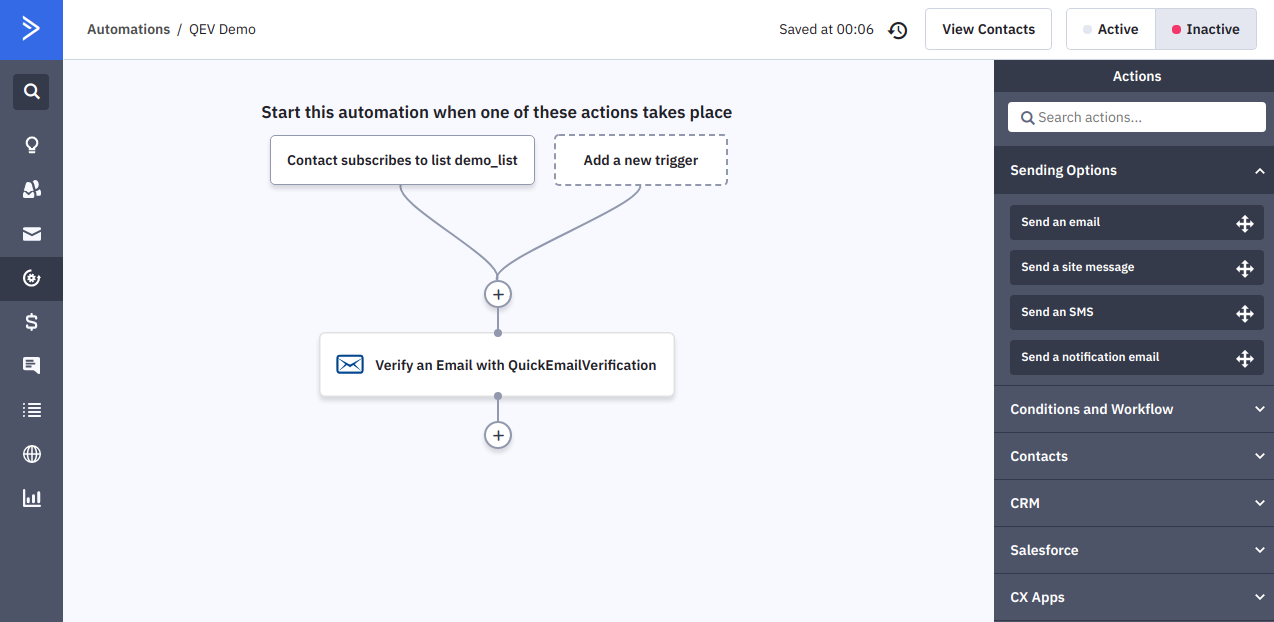
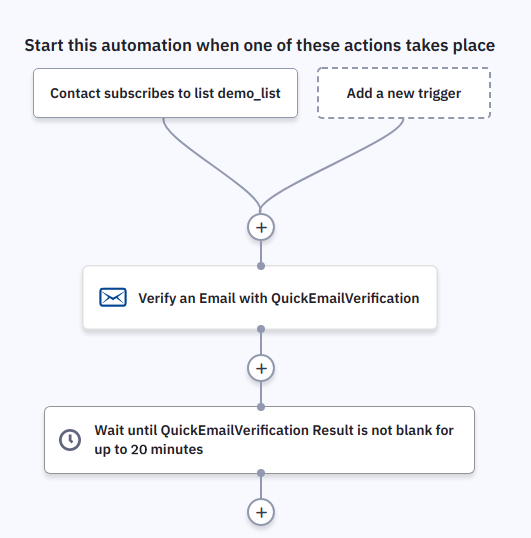
- Once you have set up a trigger, it's time to set up the QuickEmailVerification action. To set up action, click on the plus icon. Then click on the "CX apps" option and you will be able to see the QuickEmailVerification action "Verify an email with QuickEmailVerification" there. Select the "Verify an email with QuickEmailVerification" option.
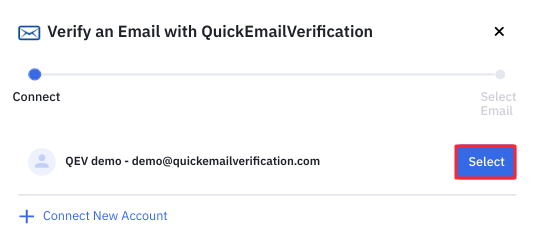
- ActiveCampaign will then ask you to choose the QuickEmailVerification account you have connected with. Select appropriate QuickEmailVerification account to proceed further.
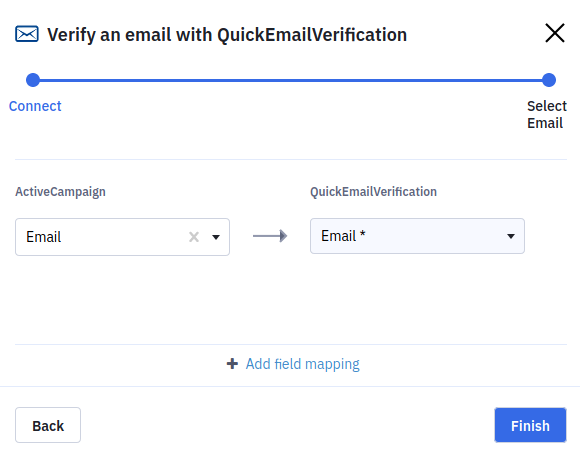
- Now you'll see an option to map fields. You need to map the email field of the ActiveCampaign with the QuickEmailVerification email field. Then click on the "Finish" button. With the above easy steps you have successfully connected the QuickEmailVerification app with ActiveCampaign.
That's it. You have added QuickEmailVerification action successfully in your Automation.
Now it's time to add a condition to our sample workflow to ensure deliverability. For example, once QuickEmailVerification completes the email verification process, you can send emails to users with email addresses that are not poor quality (e.g. not invalid or not disposable). You can do it into two steps:
- Add wait condition before proceeding further
- Add filter condition based on QuickEmailVerification result
Let's start by setting up step one.
Step 1 :
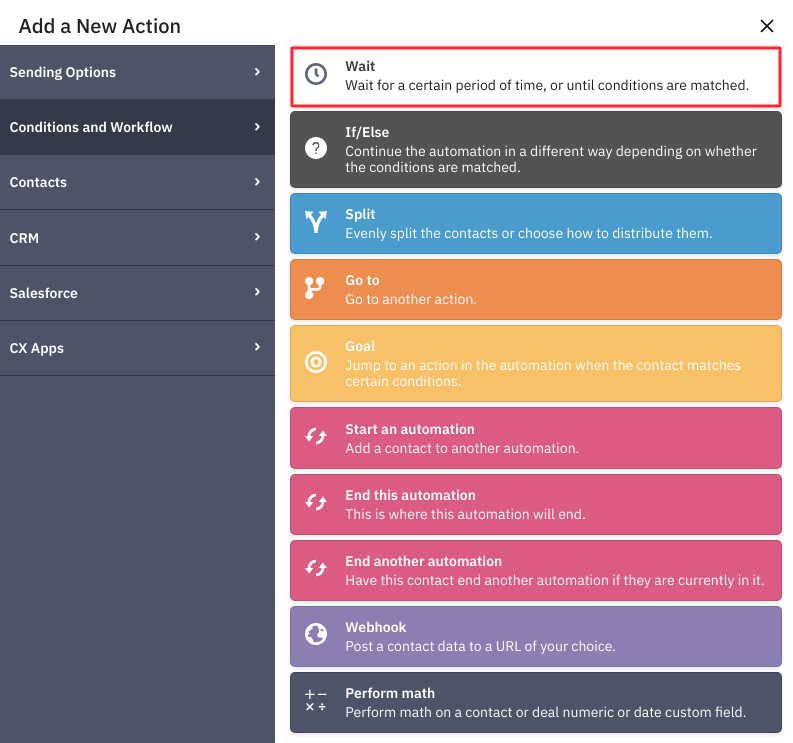
- Some times, the process to update custom fields in ActiveCampaign by QuickEmailVerification results may take a while. In that case, you need to wait for some time before proceeding to the next step. To add wait into Automation, click on the plus icon and then go to "Conditions and Workflow" option. You will see the following screen. Click on the Wait option from there.
- ActiveCampaign will then ask to choose wait condition in the next window.
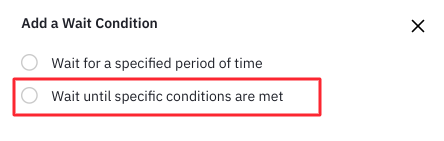
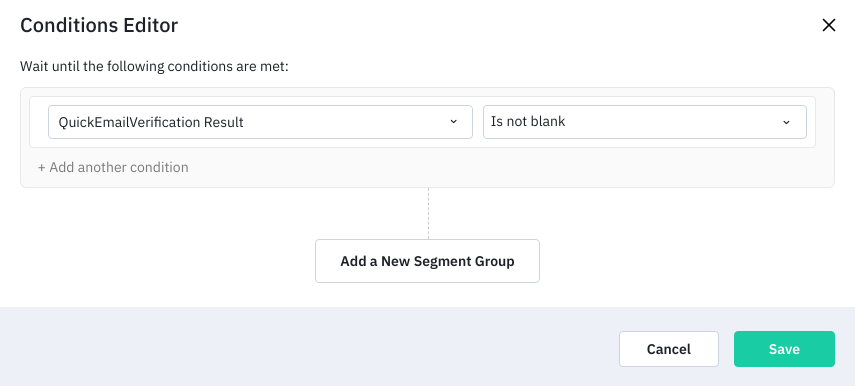
- Select "Wait until specific conditions are met" from the above window. On the next window, you will need to specify the conditions such that until specified conditions satisfy, automation should wait.
-
Next click on Save button and ActiveCampaign will then ask you to specify the maximum time for which Automation should wait for the specified conditions to be met.
-
We suggest you set a time limit of 20 minutes to get ActiveCampaign custom fields updated with QuickEmailVerification results.
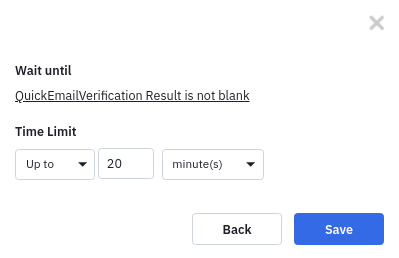
Specifying 20 minutes as the maximum time doesn't mean that the automation always waits for 20 minutes. The automation resumes as soon as QuickEmailVerification results are updated into ActiveCampaign custom fields.
- Click on Save button and you will see Wait is added successfully in Automation.
As you have set up wait condition, now it's time to set up step two.
Step 2 :
For better deliverability, improved ROI, you need to add conditions on QuickEmailVerification Result before sending mails to ActiveCampaign contacts.
- To add condition in workflow, please click on plus icon again and then click on "Conditions and Workflow" option and you will see the following screen.
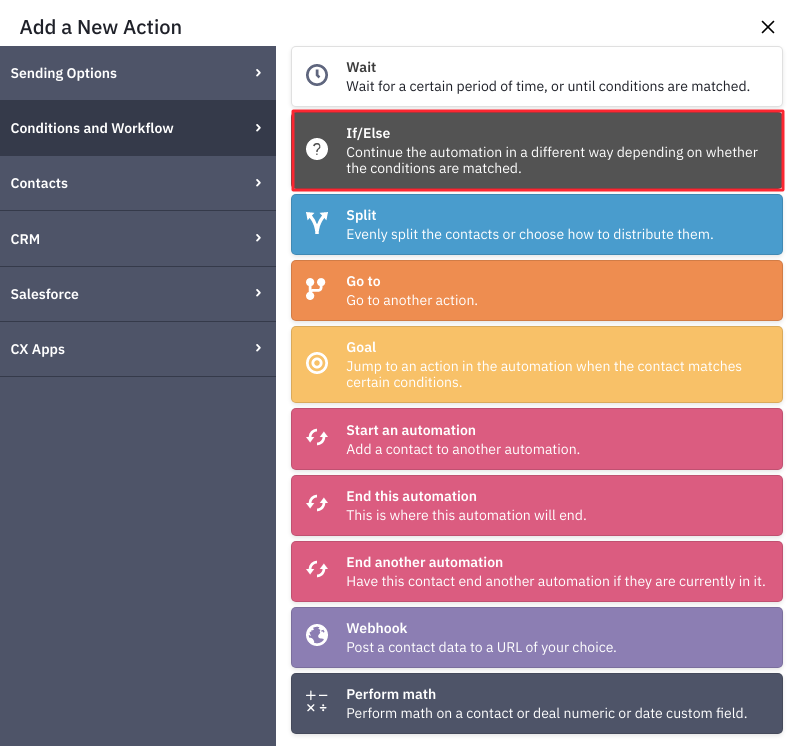
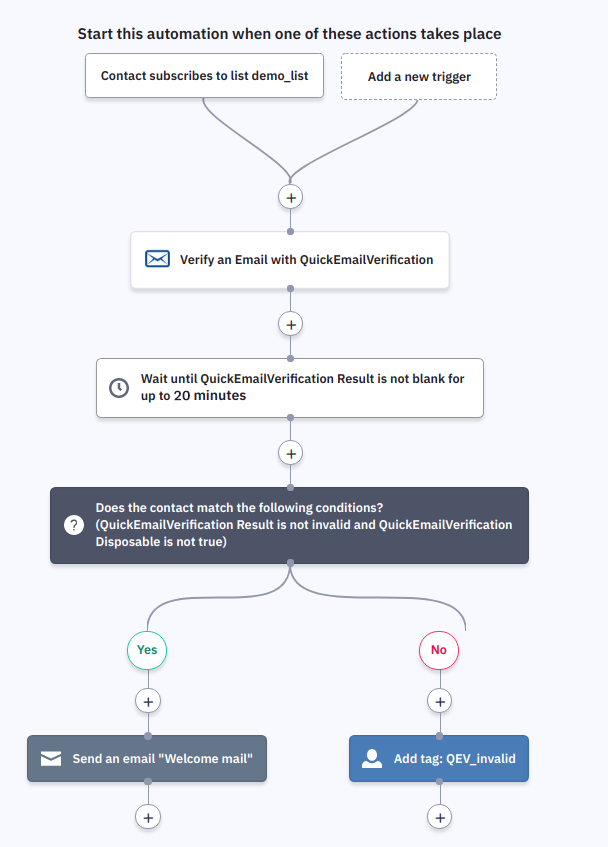
- Click on If/Else option, you will be asked to specify conditions. We would suggest you set the condition as per the following image.
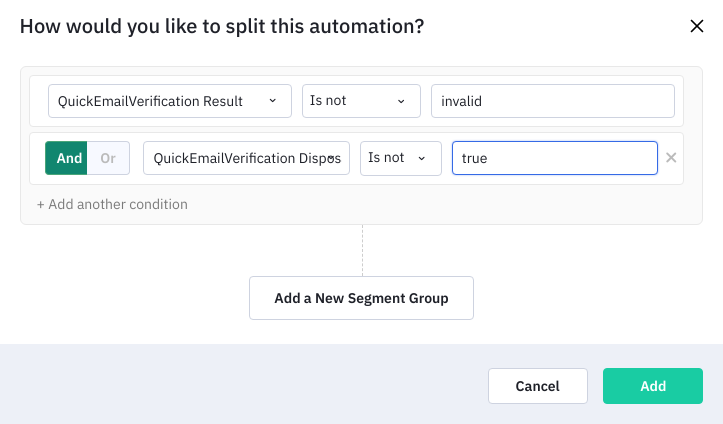
Click on Add button after you add conditions to Automation. You can see your ActiveCampaign automation is ready.
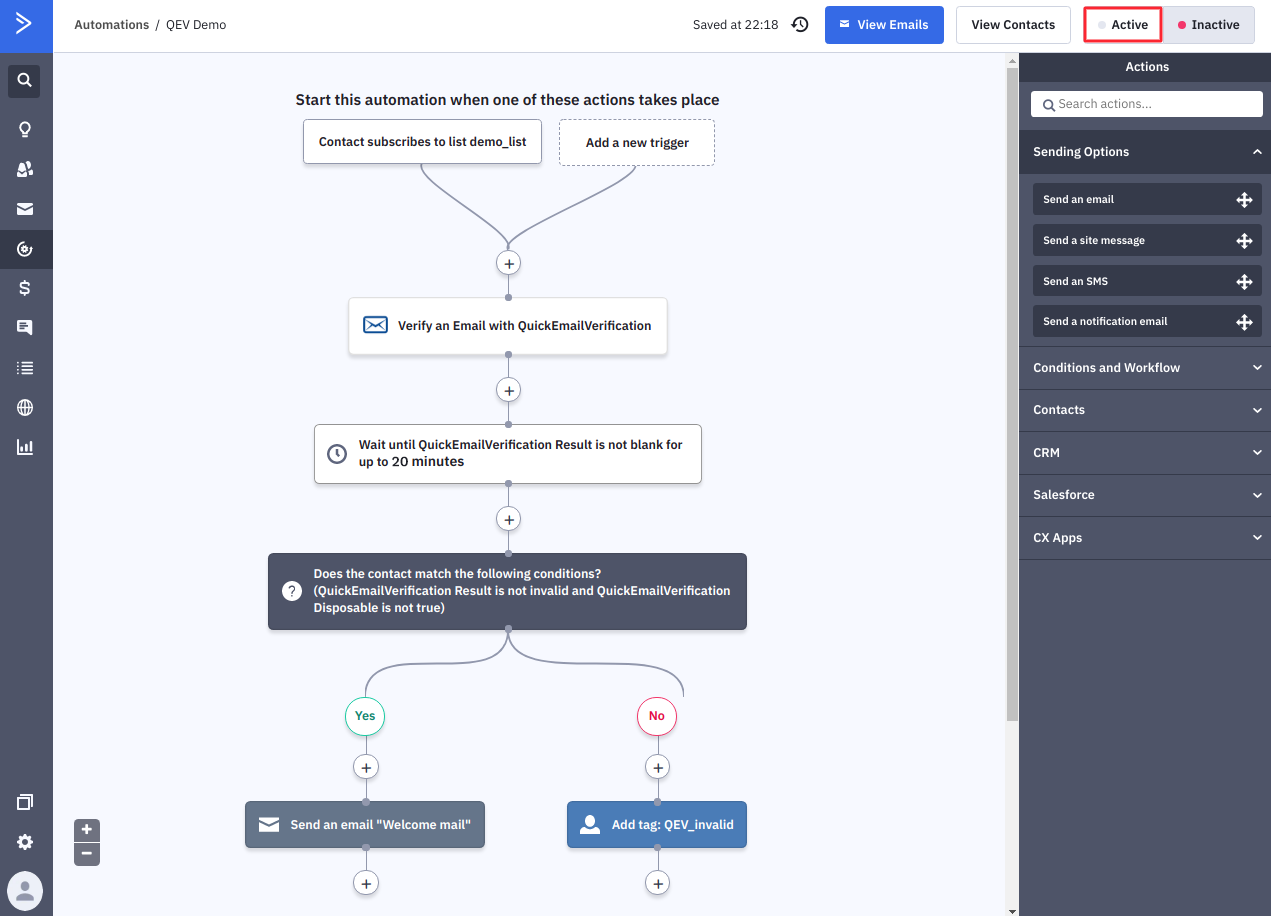
Now to automate your work, you need to make the automation Active. That way, an email address will be verified by QuickEmailVerification when the defined trigger activates.
In order to see the QuickEmailVerification result populated in ActiveCampaign custom fields, please reload the contact details page.
Activating Automation
- You can make an automation active by clicking on the Active button from the top right corner from your automation.
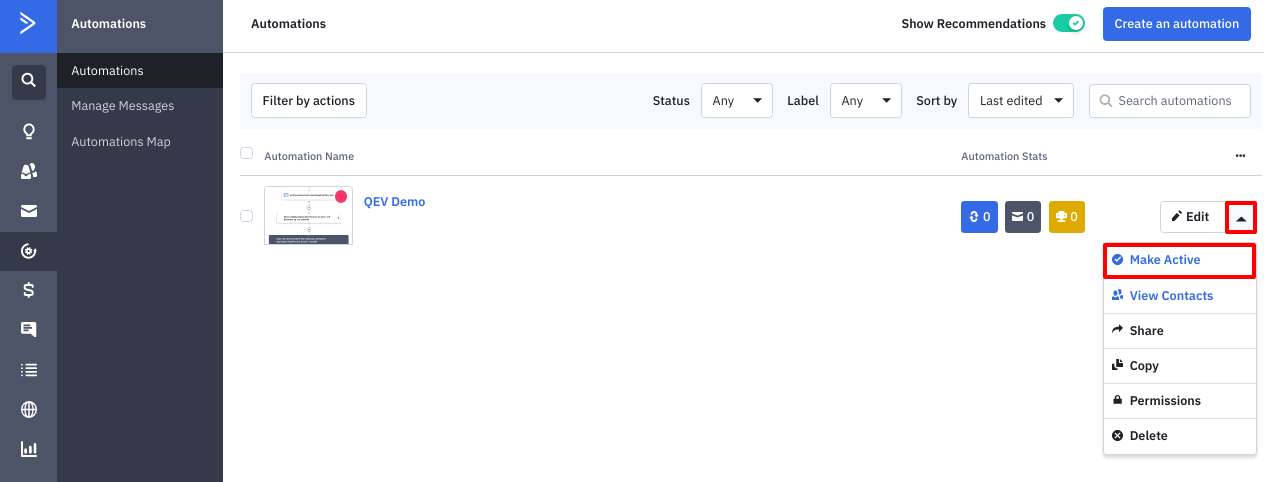
Alternatively you can activate your automation from the list of all automations. Where you click on the down-caret icon and then click on "Make Active" to activate your automation.
Verify existing contacts through Automation
Here's how you can verify your existing ActiveCampaign email contacts without the process of manually importing and exporting them.
You'll need just a few changes in your automation and you're set!
Step 1 :
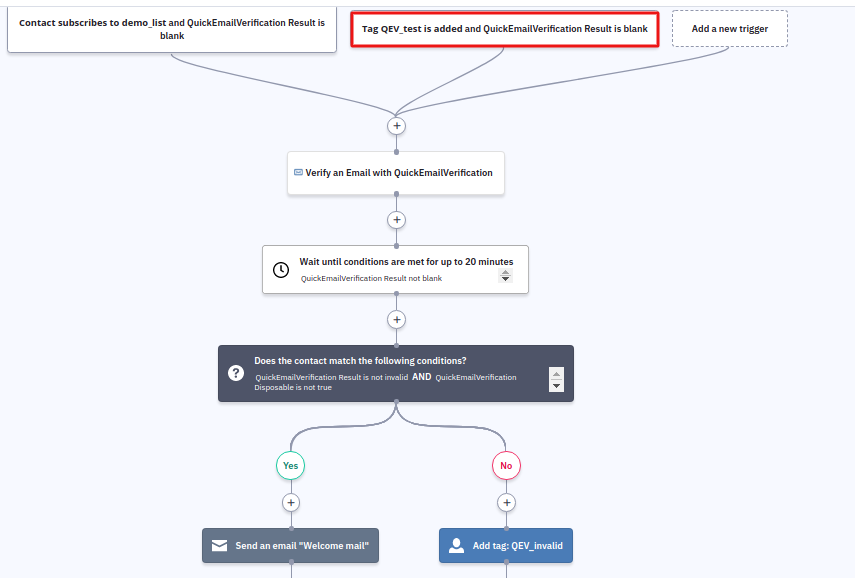
Add trigger "Tag is Added and QuickEmailVerification Result is blank" to your QuickEmailVerification Automation. To set up this trigger you may refer to the following screenshot.
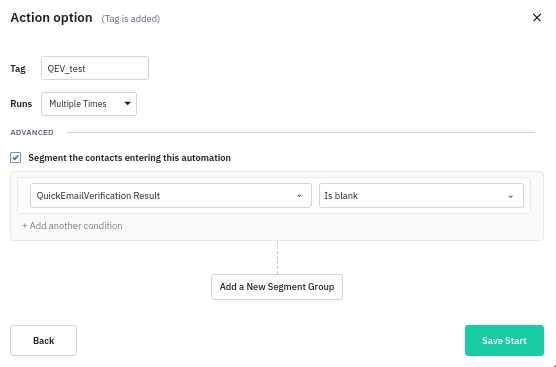
Once you have added the "Tag is Added and QuickEmailVerification Result is blank" trigger, your automation should look like below.
Step 2 :
Add a tag "QEV_test" to all your contacts. Follow these steps to add a tag to all leads using bulk action in order to trigger the Automation that will verify existing contacts through QuickEmailVerification.
- Go to 'Contacts' tab
- Then click on 'Edit all' button
- After that click on 'Add a tag' option
- Add tag name as "QEV_test" into input box, then click on 'Add' button. Finally, click on 'Apply' button.
Once you complete step#2, all your contacts will have 'QEV_test' tag added.
As per the Automation, a tag is added to contacts so Automation will be executed for all the contacts which have empty results or which are not verified yet from your existing lists.
Once Automation completes execution, results will be updated to your unverified ActiveCampaign contacts and all the invalid contacts will have a 'QEV_invalid' tag. On the basis of this tag, you can take action as per your requirement.
After verification of your existing lists, if the trigger (Tag is Added and QuickEmailVerification Result is blank) is not useful anymore to you, you may remove the trigger from your automation. You may also remove the tag(QEV_test) which you have added to your contacts.
That's it
You see how easy it is to use QuickEmailVerification app into ActiveCampaign.
From now on, whenever the QuickEmailVerification app is used, you will see the verification results will be added with the contact detail page.
We are sure you'll be able to make the most of this integration. In case you need help, feel free to get in touch with us at support@quickemailverification.com. We'll be happy to help!